Sunday, February 20, 2011

The difference in designs

I’ve been doing some research to figure out what it is that makes up the bits and pieces in each design we see and cannot put it in words better than this excerpt from the Henna Page.


Essentially though, each design is made up of little patterns that are repeated in various ways. Here are some brief descriptions and links that shows some of the difference in popular styles:

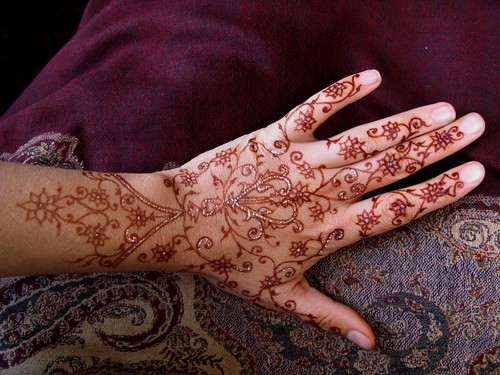
  • North African designs, like this Moroccan one, are known for the geometric quality of their designs.

  • Designs from the Middle East allow for open space in the design and have an organic nature, usually incorporating vines and flowers.

  • Persian designs are typically repetitive in that they have a very rhythmic quality to them.

  • Pakistani henna often covers everything from the elbows to the fingertips with intricate designs.

  • Indian henna depicts cultural symbols in many of the designs. Some of the most common motifs include buds (new life, love), peacock or paisley symbols (love, fertility or good luck), and the growing vine or scorpion (love or protection from the evil eye).

In India, one tradition is that brides are hennaed before their wedding. The initials of her groom are hidden inside of the design and if he cannot find them the belief is that she will be more in charge of their relationship than him. In some cases, not being able to find his initials means he also has to give her a gift.


Another tradition says that the darker a bride’s mehndi is, the more her mother-in-law will love her.

Henna has a traditional, symbolic and/or religious impact on most cultures except for that of America, where we embrace henna as purely decorative. American designs are often iconic, meaning that they are pictures of things we like.

Saturday, February 19, 2011

Henna's history

Now that we have some of the important facts about henna in the here and now, I think it’s important to go back to the beginning and figure out where all this talk of henna came from in the first place.

Henna, according to historians, has been around for at least 5,000 years. There are passages in the Bible that are believed to reference henna and it shows up in works of art that are as old as the 4th and 5th centuries AD. The specific origins of henna are widely debated, but most agree that it began somewhere in the Middle East or in Northern Africa.

Here are a few maps that show how henna may have spread:

Where henna has been for thousands of years

Henna of yesterday

Henna of today

Henna has its uses in a wide variety of areas. The most well-known purpose is that of dying the hair and drawing semi-permanent tattoos on the hands and feet. But there are records of henna doing more for people; in the past it has been used to dye textiles like wool, silk and animal skins, being used for healing, and in the summer, henna is applied for its cooling properties.

In some places, it is believed that henna was first used to cool the body by dipping the hands and feet in. Over time, people realized that they could get the same effects from intricate designs. It became both fashionable (a good way to stand out without spending money) and allowed people to be comfortable in the hot weather.

Other uses include soothing burns, relieving headaches when mixed with vinegar, helping certain types of eczema, and coagulating open wounds.

Cool fact: Even mummies from 1200 BC have been found with traces of henna on them.

Sunday, February 6, 2011

A little how-to for us all

I thought today would be a good day to look at some easy recipes and tips for creating henna paste. While I haven’t used any of these recipes myself, they are fairly standard among all the recipes out there.

In my own experience, I have noticed that when I used my fresh henna paste immediately after making it, the designs turned out very golden. Waiting several hours (better yet, a full day) produced much better results.


Recipe #1:

Make tea (about four teaspoons of tea) and boil off ¾ of the liquid

Add:

2 Tbs. coffee

Enough henna to make a thin, watery paste

5-6 drops of clove oil or the paste of five-six cloves

Allow it to cool for about 2-3 hours and then use as you need.


Recipe #2:

Boil:

2 Tbs. pure henna powder

5 slices of dried lemon

1 tsp. sugar

until it becomes bright red.

Cool until warm and mix. Let is soak overnight.

Add:

Half a spoon of geranium essential oil and one teaspoon of cajeput essential oil. If paste is too thick, add a little warm water until it reaches the desired consistency.


Recipe #3:

Mix:

3 Tbs. henna powder

Half a spoon of mustard oil

Juice of half a lemon

Adjust consistency by adding water at room temperature.


Recipe #4:

Boil:

1 to 1-1/2 cups of water with 2 tea bags

Let steep for 5 minutes.
Mix in:

2-3 Tbs. henna powder

4-6 Tbs. freshly squeezed lemon juice or pre-mixed lemon concentrate

Things to keep in mind:

-Use a glass, ceramic or cast iron bowl to avoid staining kitchen items.

-In general, the consistency of the henna paste should be a little thinner than toothpaste for easy application.

-Clean the skin before applying henna (no lotions or oils).

-Applying a warm, wet towel to the area to open pores. The henna will sink slightly deeper into the skin.

-Never apply henna over an open cut or scratch. The henna will permanently stain the skin. **Not a good way to tattoo skin. The henna will spread out in the skin, looking like a blotchy freckle and henna is not a sanitary way to create tattoos.

-Dissolve lemon juice and sugar in a 1:1 ratio, then apply onto the henna design with a cotton ball when it starts to dry up. If the design is too dry, the design will stick to the cotton ball. Dabbing the design every 10-15 minutes for 4-5 hours will produce a darker, clearer design. This can also be done using a spray bottle.

-Henna paste should be allowed to sit for a while (in the refrigerator) to let the color release. 24 hours is a good amount of time to wait, but the time can vary depending on the mixture. Color release ensures a darker design


Great before and after of henna-dyed hair


Here are some links to Amazon if you're interested in buying henna products:


Henna applicator bottles

Ahmed Afshan Mehndi Henna Powder

Henna Powder from Jaipur

Earth Henna Tattoos (I've used this one before and like it.)

Tuesday, February 1, 2011

Some of the Work I've Done


Discovering the world of henna

Fact: Henna is actually the name of the paste that is used, not the design being created. Technically, when we say that we "got henna done" it's like saying we "got nail polish done." We're simply tattooing ourselves in a non-permanent way. Most often, this is referred to as Mehndi.

My goal for the next few weeks (or months) is to delve a little deeper into the world of henna.

I was first introduced to Henna when I was in middle school. My local library offered great programs each summer for kids. One summer, a lady was there to teach us about Mehndi and everyone got a free tattoo. She did a great job and it was all free-hand. I was so excited that I immediately went to the non-fiction section with my mom and we checked out every book the library owned on the topic. The one I still remember is called Mehndi: The Timeless Art of Henna Painting by Loretta Roome. It gave me some great information and beautiful designs for inspiration.

The different areas I'm setting out to explore include:
  • The history of henna
  • Different styles around the world
  • Uses for henna
  • About the plant itself
  • How henna works
  • How to make henna from powder instead of buying it pre-made
I'll try to include links to other websites and pictures of what I'm doing or have done, but please feel free to contact me if you have suggestions, comments or more information.

Excited to begin my search!